Beer Beef Stew Recipe

Today’s post comes from my sister-in-law, Meg and her boyfriend Russell. A dangerous combination in the kitchen, these two love whipping up healthier alternatives and testing out Paleo recipes on the weekends. When my friends at Sapporo reached out, offering samples of their beer, I initially kindly refused, knowing that it’s far too difficult to ship beer to Switzerland. But, within seconds, I realized that Meg and Russell would love using the beer as recipe inspiration. Just in time for St. Patrick’s Day, this beer beef stew recipe will warm you right up!

Happy Spring everyone! I hope it is is sunny and warm wherever you are, but here in New York, the cold weather has lingered a bit. Yesterday, Russell and I found it a bit too cold and windy for outdoor adventures but not cold enough to continue winter hibernation. So, we decided to spend the day cooking. 

This recipe takes a while but, the majority of that time, the food is in the oven. This is a great stew to make during a Netflix binge and since the new season of House of Cards is out, that’s exactly what we did.

INGREDIENTS

  • 3 tablespoons all-purpose flour
  • 1 1/2 tablespoons coconut oil
  • 1 (1-pound) boneless chuck roast, trimmed
  • 1 teaspoon salt, divided
  • 1/2 teaspoon black pepper
  • 1 cup fat-free, less-sodium beef broth
  • 4 garlic cloves, crushed
  • 1 (22-ounce) Sapporo beer
  • 1 bay leaf
  • 3-4 carrots, peeled and cut diagonally into 1/2-inch-thick slices
  • 9 ounces small turnips, peeled and cut into wedges (or one large turnip cut into chunks)
  • 1 medium onion, peeled and cut into wedges
  • 3-4 Parsnips, peeled and cut into ½-inch thick slices


PREPARATION

  • Preheat oven to 300°.
  • Heat oil in a Dutch oven over medium-high heat.
  • Season beef with salt and pepper. Then coat with flour.

  • Add beef to pan; cook until brown on all sides.
  • Add the broth, half of the beer, garlic, and bay leaf. Keep scraping pan to remove browned bits.
  • Bring to a boil. Cover and bake at 300° for 1 1/2 hours.

  • While the beef is in the oven, I chop all of my veggies

  • Add carrots, turnips, parsnips and onion and bake (covered) an additional 1 hour and 5 minutes or until vegetables are tender and beef is fork-tender.
  • Remove beef and vegetables from pan; discard bay leaf. Cover beef mixture; keep warm.
  • Strain the cooking liquid.
  • Put the liquid back into the Dutch oven, uncovered on the stove.
  • Bring to a simmer.
  • Add the second half of the beer and allow the liquid to reduce for 20 -30 minutes or until it has reached a consistency that you like.
  • Serve the vegetable and meat mixture in a bowl, and pour desired amount of liquid on top.

*Thank you to Sapporo for the complimentary product samples and inspiration!

Share Button
Follow:
Share:
Comments Off on Beer Beef Stew Recipe

Paleo Pumpkin Pancake Recipe

pumpkin paleo pancakes

Here’s a delicious, healthy Fall recipe you can make this weekend, courtesy of my sister-in-law Meg and her husband Russell! Originally posted in 2014, the post and recipe have been updated a bit. 

Over the past two years we have both had great success following Paleo-like diets off and on, especially when my sister-in-law originally lost 10 pounds in one month.  Since then, she and her now husband have evolved their eating style, maintaining a healthy balance which often includes Paleo friendly recipes.  We’ve made a lot of omelets and frittatas in the past, but now that the leaves are falling and the air is crisp, we wanted to cook something that reflected the fall season. And what better than a warm stack of fall themed pumpkin pancakes?

meg-and-russell

We struggled to find a recipe that was fluffy and tasty enough to stand up to a regular pancake. Some of our first batches, while tasty, left us with results that we could only describe as “scrambled pancakes”. We thought we were cooking them wrong because they were so crumbly and dense. To remedy this, we tried cooking them at a lower heat for a longer time, we tried different types of flour, and different wet and dry ingredients but couldn’t replicate the consistency of the traditional pancakes we grew up with. After scouring the web and trying parts from numerous recipes, we finally figured it out. Baking soda. Not all Paleo recipes call for baking soda, which is one of the things that makes these pancakes so fluffy and DELICIOUS!

pumpkin paleo pancakes

Paleo Pumpkin Pancake Recipe

Ingredients:

2 large eggs

½ cup pumpkin puree

2 tablespoons of sugar free syrup

½ teaspoon allspice

½ teaspoon cinnamon

⅔ cup almond flour

a dash of kosher or sea salt

½ teaspoon vanilla extract

¼ teaspoon baking soda

½ cup pecans

Instructions:

  • Heat a small skillet over medium heat with a touch of coconut oil. Add pecans. Toast for about 3 minutes or until pecans are fragrant. Be careful not to burn the pecans – shake the skillet frequently. (Note – these are for the topping. Feel free to leave them raw if desired or not use them at all).
  • In a large mixing bowl, whisk together eggs, pumpkin, syrup, cinnamon, allspice, and vanilla until well blended.
  • In a separate bowl, mix together the almond flour, salt and baking soda.
  • Stir the dry ingredients into the wet ingredients, making sure there are no lumps.
  • Lightly grease a griddle with your fat of choice (we used coconut oil) and turn on medium heat until a drop of water sizzles on the griddle.
  • Pour the batter onto the griddle in whatever size pancakes you like. Cook until bubbles form on the top of the batter. Carefully flip and cook the other side.
  • Stack and top with pecans and sugar free syrup (or whatever fun fall toppings you choose!). We also dusted ours with a bit of cinnamon.

*Note – you will see in the picture we served these with bacon (which makes every meal better). During our Paleo challenge, we learned that most bacon you can find at the grocery store is cured in sugar. We recommend Organic Sunday Bacon by Applegate which has less sugar than most and is cured in Paleo friendly, organic cane sugar.

If you love this recipe as much as we do, please share it on Pinterest, Twitter or Facebook!

Share Button
Follow:

Cooking with Bo: 5 Favorite Kitchen Tools

Happy Friday! I don’t know about you guys but I am certainly ready for the weekend. Bad weather along with Bo’s recovery from surgery means that we have no plans. I could not be happier with this as a little bit of casual relaxation is just what I’m craving. I have 17 solo miles on the plan tomorrow morning and after that you will most likely find me relaxing on the couch watching Robin Williams’ best movies including Good Morning Vietnam, Good Will Hunting, Mrs. Doubtfire and Dead Poets Society.

Today’s post is another great one from Bo. As you all know, he is the expert in our kitchen unless it has to do with smoothies or baking. While he’s teaching me little by little, he has far more experience cooking than I do. We thought it would be fun for him to share our top 5 kitchen tools. Many of these we received as part of our wedding registry and they have been part of our home for almost 5 years!

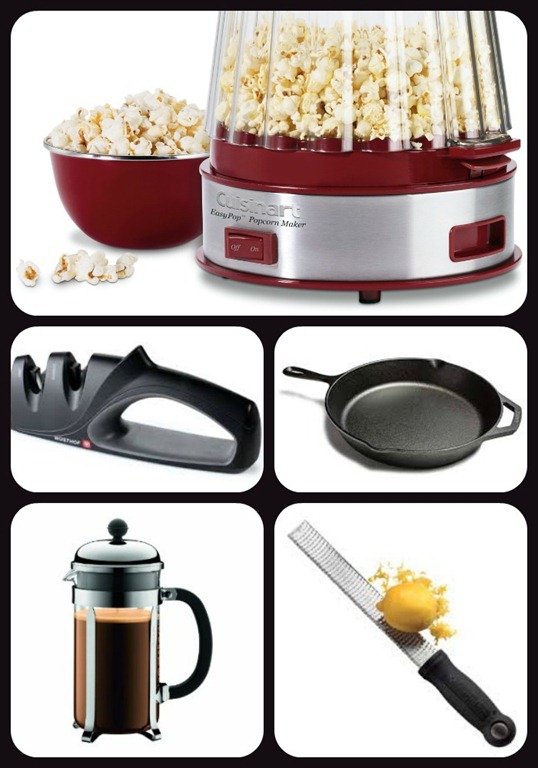
5 Favorite Kitchen Tools 

Wusthof Knife Sharpener One of the most annoying things in the kitchen is doing prep work with a dull knife. It is less efficient, you end up crushing things rather than cutting them, and it is actually more dangerous. Even if you don’t want to spend $1,000 on a full set of high-end knives, spend around $20 on a simple sharpener and keep your knives sharp.

Lodge Cast Iron Skillet I will readily admit that I likely wouldn’t have one of these if it weren’t for Ashley.  My mother never had one and I originally saw them as old-fashion and unnecessary.  However, I now know that this is one of the most useful pans in the kitchen.  It’s high specific heat means that it takes longer to bring up to temperature but it also looses heat slower than copper or steal.  It is perfect when you need to brown meat, its great when making an integrated sauce and goes perfectly into the oven. I even use it rather than a roasting pan when I make roasted chicken as I like the way that it radiates and helps brown the skin.

Microplane Classic Zester/Grater This is an incredibly useful kitchen tool.  Use it to grate ginger, Parmesan and nutmeg as well as to zest citrus.  The texture is unlike anything you get with any other tool.

Bodum 8 Cup French Press Coffee Maker I have always loved strong coffee and I think that the flavor that is produced by a French press cannot be replicated by any other means.  I would also love to own a really nice espresso machine but I can never seem to bring myself to spend the money.

Cuisinart Popcorn Maker This is a bit of a silly one but I LOVE popcorn. I also love having the ability to make it fresh, hot, and to control the amount of oil used.  I remember trying Healthy Choice popcorn once and thinking that it was the most disgusting thing that I had ever put in my mouth.  The stuff that comes out of here is just as healthy but tastes great!

Your turn – What is your favorite kitchen tool?


Share Button
Follow: